【QCustomPlot】使用方法(动态库方式)
说明
使用 QCustomPlot 绘图库辅助开发时整理的学习笔记。同系列文章目录可见 《绘图库 QCustomPlot 学习笔记》目录。本篇介绍 QCustomPlot 的一种使用方法,通过动态库的方式进行使用,示例中使用的 QCustomPlot 版本为 Version 2.1.1。
1. 下载源码
详见本人另一篇博客 【QCustomPlot】下载,下载 QCustomPlot-sharedlib.tar.gz 动态库版的压缩包,解压后里面有个 readme.txt 文件,介绍了如何编译 QCustomPlot 动态库以及如何使用编译出来的动态库,本篇博客将以此为参考,介绍如何通过动态库的方式使用 QCustomPlot 绘图库。编译动态库时,需使用到 qcustomplot.h 与 qcustomplot.cpp 两个文件。使用动态库时,需把 qcustomplot.h 文件及动态库放在编译器能找到的地方,并在相关文件中通过 #include 的方式包含该头文件,而不能在 pro/pri 文件中通过 HEADERS += 的方式包含 qcustomplot.h ,否则会报错。
2. 编译动态库
编译动态库时,需三个文件:pro 文件、qcustomplot.h 与 qcustomplot.cpp 源码文件。
2.1 编译动态库的工程文件 .pro
pro 文件用于设定动态库的编译方式及相关信息,新建一个 txt 文本文件,将以下代码拷贝进去,然后更改 .txt 后缀名为 .pro,就得到了所需的工程文件,不妨将该工程文件命名为 sharedlib-compilation.pro。
QT += core gui
greaterThan(QT_MAJOR_VERSION, 4): QT += widgets printsupport

greaterThan(QT_MAJOR_VERSION, 4): CONFIG += c++11
lessThan(QT_MAJOR_VERSION, 5): QMAKE_CXXFLAGS += -std=c++11

DEFINES += QCUSTOMPLOT_COMPILE_LIBRARY
TEMPLATE = lib
CONFIG += debug_and_release build_all
static {
  CONFIG += static
} else {
  CONFIG += shared
}

VERSION = 2.1.1

TARGET = qcustomplot
CONFIG(debug, debug|release) {
  TARGET = $$join(TARGET,,,d)
  QMAKE_TARGET_PRODUCT = "QCustomPlot (debug mode)"
  QMAKE_TARGET_DESCRIPTION = "Plotting library for Qt (debug mode)"
} else {
  QMAKE_TARGET_PRODUCT = "QCustomPlot"
  QMAKE_TARGET_DESCRIPTION = "Plotting library for Qt"
}
QMAKE_TARGET_COMPANY = "www.qcustomplot.com"
QMAKE_TARGET_COPYRIGHT = "Copyright (C) by Emanuel Eichhammer"

SOURCES += qcustomplot.cpp
HEADERS += qcustomplot.h
2.2 整理编译目录
将上面的 sharedlib-compilation.pro 和 qcustomplot.h、qcustomplot.cpp 三个文件放在同一个文件夹下。

2.3 编译出动态库
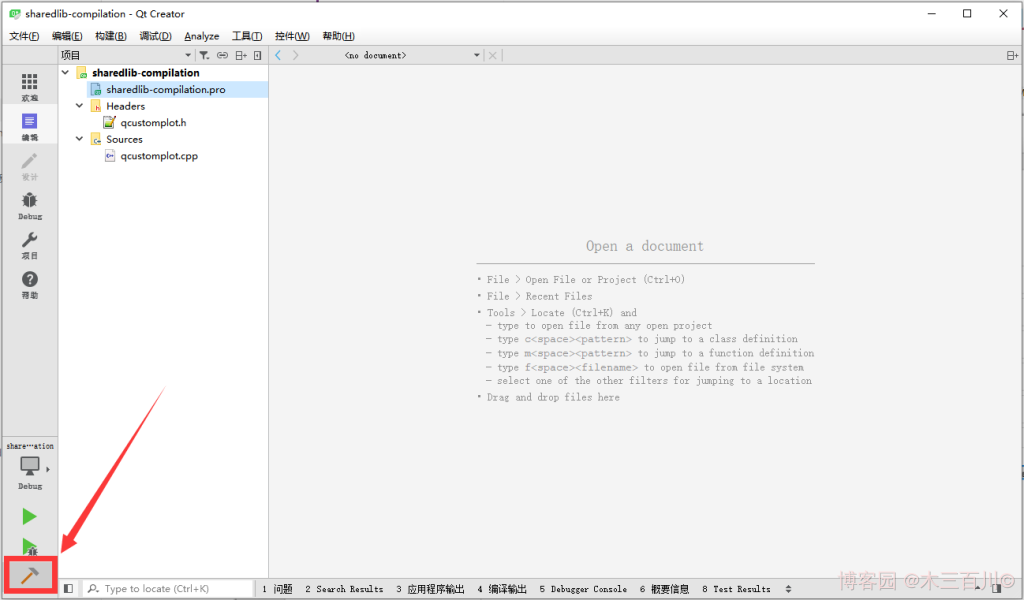
使用 Qt Creator 打开 sharedlib-compilation.pro 文件,选择合适的编译器,这个编译器必须与后面使用动态库时的编译器一样,比如都为 MSVC2015 64bit。(编译时选择 Debug 模式或者 Release 模式都可以,不影响最后的使用,因为 .pro 文件里面有设置,不管是哪种模式,最后两种版本都会生成。)

点击左下角这个锤子图标,编译动态库,等待编译。

编译完成后,会在构建目录下生成动态库,我的构建目录为(因人而异):
E:\Cworkspace\Qt 5.9\QtDemo\build-sharedlib-compilation-Desktop_Qt_5_9_2_MSVC2015_64bit-Debug
该目录的 debug 与 release 子目录下分别有对应版本的动态库,使用时只需要 .lib 以及 .dll 文件(不同平台编译器的生成结果会有差异)。


3. 使用动态库
使用动态库时,需把以下三个文件放在编译器能找到的地方:上一步生成的 .lib 以及 .dll 文件(不同平台编译器的生成结果会有差异,但都是一个静态库文件和一个动态库文件)、qcustomplot.h 文件。同样以 MSVC2015 64bit 为例。
3.1 在使用工程文件 .pro 中添加代码
在使用动态库的 .pro 工程文件中添加以下代码(库的路径因人而异,下面假设动态库放在了 .pro 文件同级目录下):
greaterThan(QT_MAJOR_VERSION, 4): QT += printsupport

greaterThan(QT_MAJOR_VERSION, 4): CONFIG += c++11
lessThan(QT_MAJOR_VERSION, 5): QMAKE_CXXFLAGS += -std=c++11

# Tell the qcustomplot header that it will be used as library:
DEFINES += QCUSTOMPLOT_USE_LIBRARY

# Link with debug version of qcustomplot if compiling in debug mode, else with release library:
CONFIG(debug, release|debug) {
  win32:QCPLIB = qcustomplotd2
  else: QCPLIB = qcustomplotd
} else {
  win32:QCPLIB = qcustomplot2
  else: QCPLIB = qcustomplot
}
LIBS += -L$$PWD -l$$QCPLIB
若使用 MinGW 编译器,生成的静态库文件名字前面可能多了 lib 三个字母,包含时需对名字做对应修改:
# Link with debug version of qcustomplot if compiling in debug mode, else with release library:
CONFIG(debug, release|debug) {
  win32:QCPLIB = libqcustomplotd2
  else: QCPLIB = libqcustomplotd
} else {
  win32:QCPLIB = libqcustomplot2
  else: QCPLIB = libqcustomplot
}
LIBS += -L$$PWD -l$$QCPLIB
添加以上代码后,就可以按正常方式使用 QCustomPlot 绘图库了。
3.2 使用注意事项
通过动态库的方式进行使用时,需注意以下几点:
- 编译动态库时的编译器版本必须和使用动态库时的编译器版本保持一致。
- 生成的动态库文件、静态库文件、
qcustomplot.h文件必须放在编译器能找到的地方,比如.pro文件所在目录、生成目录。 - 不能使用
HEADERS +=的方式在.pro文件中包含qcustomplot.h,只能通过#include的方式在相关文件中包含该头文件。
3.3 使用示例代码
工程文件(sharedlib-usage.pro)代码如下,其中的库由 MSVC2015 64bit 编译器生成:
QT       += core gui

greaterThan(QT_MAJOR_VERSION, 4): QT += widgets printsupport

TARGET = sharedlib-usage
TEMPLATE = app

greaterThan(QT_MAJOR_VERSION, 4): CONFIG += c++11
lessThan(QT_MAJOR_VERSION, 5): QMAKE_CXXFLAGS += -std=c++11

# Tell the qcustomplot header that it will be used as library:
DEFINES += QCUSTOMPLOT_USE_LIBRARY

# Link with debug version of qcustomplot if compiling in debug mode, else with release library:
CONFIG(debug, release|debug) {
  win32:QCPLIB = qcustomplotd2
  else: QCPLIB = qcustomplotd
} else {
  win32:QCPLIB = qcustomplot2
  else: QCPLIB = qcustomplot
}
LIBS += -L$$PWD -l$$QCPLIB

SOURCES += \
        main.cpp
主函数文件(main.cpp)代码如下:
#include <QApplication>
#include <QMainWindow>
#include "qcustomplot.h"

int main(int argc, char *argv[])
{
    QApplication a(argc, argv);
    QMainWindow window;

    // setup customPlot as central widget of window:
    QCustomPlot customPlot;
    window.setCentralWidget(&customPlot);

    // create plot (from quadratic plot example):
    QVector<double> x(101), y(101);
    for (int i=0; i<101; ++i)
    {
        x[i] = i/50.0 - 1;
        y[i] = x[i]*x[i];
    }
    customPlot.addGraph();
    customPlot.graph(0)->setData(x, y);
    customPlot.xAxis->setLabel("x");
    customPlot.yAxis->setLabel("y");
    customPlot.rescaleAxes();

    window.setGeometry(100, 100, 500, 400);
    window.show();

    return a.exec();
}
工程目录结构如下:
